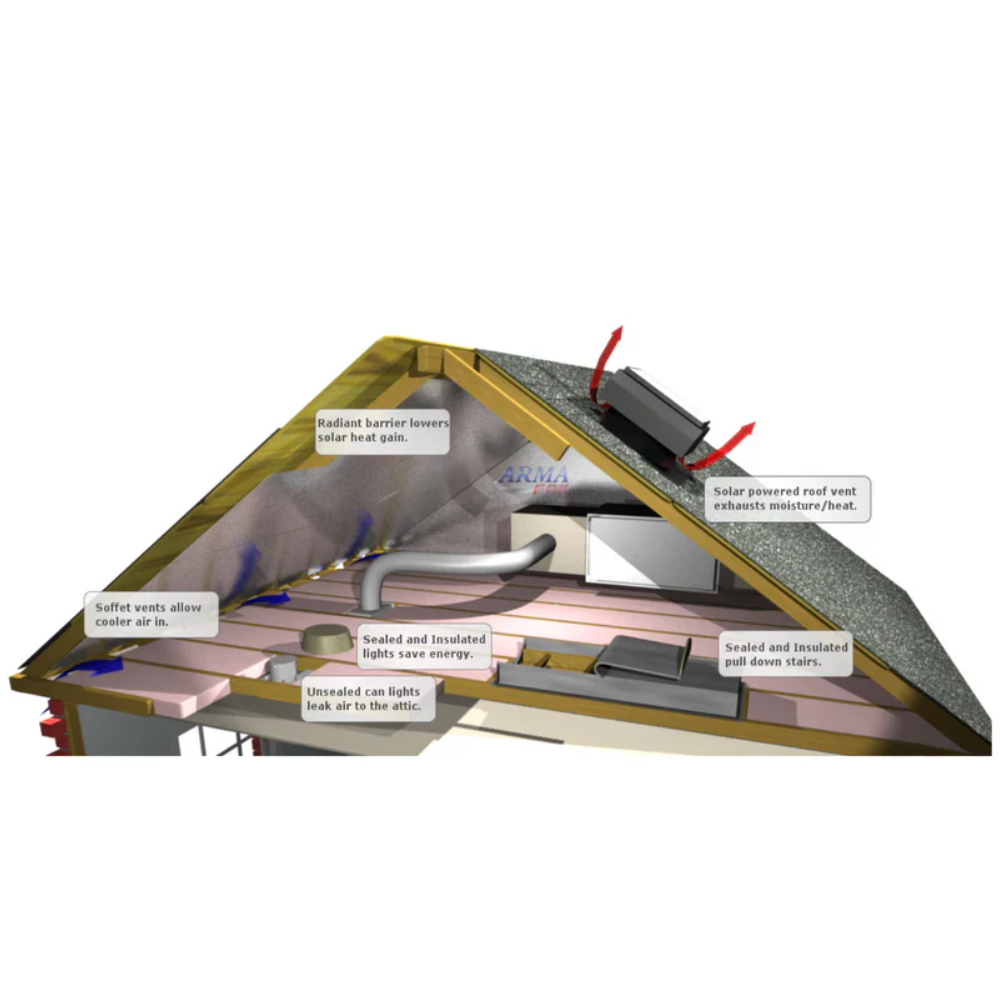
The four step approach outlined below considers the whole attic as a system. Addressing all forms of heat gain/loss and moisture related concerns is essential to creating an efficient, healthy, cost effective, and sustainable efficient attic system.Here you will learn about our total Efficient Attic Solution.

STEP 1: Install Radiant Barrier Under the Roof
Radiant heat is typically the single largest source of heat gained by a building in the summer. According to the Department of Energy, installing radiant barrier can reduce cooling bills by up to 17%.
The ⭐⭐⭐⭐⭐ Solution
Install ARMA FOIL™ perforated radiant barrier to the bottom of the roof rafters. ARMA FOIL™ is a highly reflective foil capable of blocking 95% of the sun's radiant heat. This high strength material is designed to hold staples and is well suited for use in energy efficient attics.
STEP 2: Ensure Adequate Attic Ventilation
Proper ventilation is essential to control moisture and heat buildup in an attic space. Most attics are extremely under ventilated making them vulnerable to moisture related problems and excessive heat build up. A correctly sized solar exhaust fan coupled with adequate soffit venting ensures proper attic cooling and ventilation.
The ⭐⭐⭐⭐⭐ Solution
The ATTIC BREEZE® solar-powered attic ventilation fan is simply the best attic fan available. It is powered 100% by the 25 watt solar panel and does not use any of the home's power to run. It is solid built from weather resistant materials to stand the test of time. This is the only solar fan on the market that comes with a lifetime warranty.
Size Calculator Cost Comparison Installation Instructions
The ⭐⭐⭐ Solution
Measure and ensure adequate passive ventilation. If using only passive vents(soffit, gable, ridge vent, etc), a home needs 1 sq ft of intake and 1 sq ft of exhaust vent area per 150 sq ft of attic floor. It is extremely rare to find a home built with sufficient passive venting. It is common to see 1/3 or less of the recommended amount of passive ventilation.
STEP 3: Air Seal the Ceiling
This vitally important step is completely ignored by most builders and insulation contractors. Air infiltration typically accounts for 40% of the heat lost by a building in the winter. The attic floor (ceiling) is generally the most leaky assembly in a home accounting for a large percentage of air leakage. Air leaks through all the many penetrations including: recessed lights, speakers, wire penetrations, plumbing penetrations, flue pipes, air ducts registers, attic hatches, top plates and more.
The ⭐⭐⭐⭐⭐ Solution
Remove insulation, install TENMAT® recessed light covers, apply a 1 inch coat of Two Component Attic Floor Spray Foam over the entire attic floor to completely air seal the ceiling. Once sealed, replace old insulation or add new insulation to the recommended R-Value for your climate. Install an attic stair cover to air seal the attic hatch or pull down stairs.
The ⭐⭐⭐⭐ Solution
Use Gun Foam or Tank Spray Sealant to air seal the critical points of leakage. Install TENMAT® covers to air seal recessed lights. Install an attic stair cover to air seal the attic hatch or pull down stairs.
STEP 4: Air Seal and Insulate Duct Work
Typical duct systems leak up to 30% of their air. Some of the air that you just paid to heat or cool leaks out of the system before even entering the living space. The overall efficiency of the HVAC system is reduced by the amount equal to the duct leakage.
The ⭐⭐⭐⭐⭐ Solution
Use Two Component Spray Foam to air seal and insulate the air distribution system. Be sure to cover the boots, junction boxes, plenums and other large sources of leakage. A one inch thick coat of foam is enough to completely air seal the system and adds an R-Value of 6.2.
The ⭐⭐⭐ Solution
Use fibrous duct mastic to air seal all the joints in the air distribution system. Insulate ducts to required R-Value, typically 6 or 8. Use a Spray Foam Insulation Kit to air seal and insulate the plenums. A good percentage of the leakage typically occurs at the supply and return plenum takeoffs so be sure to seal those well.


